We use cookies to make your experience better. To comply with the new e-Privacy directive, we need to ask for your consent to set the cookies. Learn more.
Repairing a Kitchen Worktop Routing Project
Repair to a blown/raised/damaged surface of a laminated chipboard worktop using the Trend Timber Repair Kit.

This project shows how to carry out a repair to a blown/raised/damaged surface of a laminated chipboard worktop, using the Trend Timber Repair Kit, Product Ref. TEMP/TRKX1/4.
This jig is commonly used for routing out blemishes in natural timber and replacing with a timber inlay (also known as a patch), and therefore would also be useful for repairs to solid timber worktops, although the patches would be fixed in with wood glue rather than silicone.
Step 1 - Identify damaged area & Router Setup
When establishing where the patch is to be positioned on the worktop, consideration must be given as to the template's accessibility; next to the back wall or another obstacle would not be possible in situ, as it would not be possible to attach the template there.

Identify the blown/damaged area to be repaired on the router
The repair in this project was carried out on the joint line, a likely area for damage, as moisture can seep in over time and cause the top surface to rise up.
Also consider the best orientation for patch. For instance, the patch may look less noticeable if positioned lengthwise along the worktop where possible.
Setting up the router
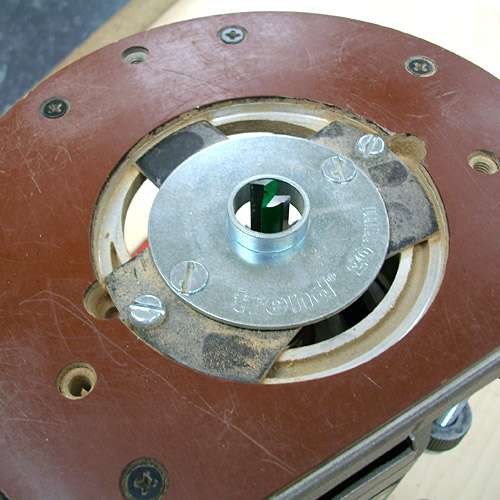
Fit the 20mm Trend guide bush supplied with timber repair jig to the router, ensuring that it will be concentric with the cutter. Some routers will need a sub-base to allow Trend Guide bushes to fit centrally, which is vital for this accurate template work.
I used a Trend T10 1/2¨ capacity router for this project, but some may find a smaller router easier to manage. Insert the 10mm diameter cutter, supplied with the jig.
Routing the insert patch
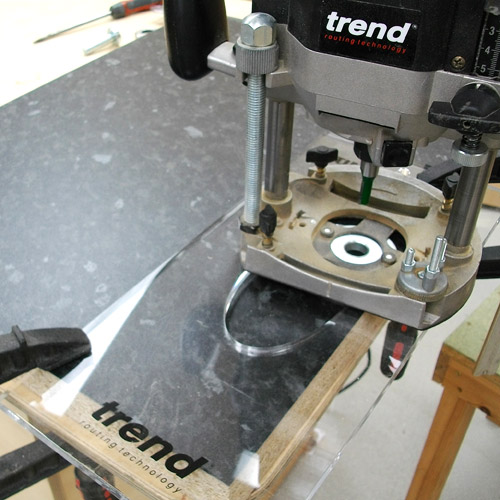
Fix the template to the worktop offcut with clamps or double-sided tape and secure the worktop offcut to a work surface to prevent it from moving.
Any grain effect or distinct pattern on the worktop should be considered when positioning the template to match the proposed repair area. With the guide bush mating on the template aperture, rout down to a suggested depth of 14mm. This should be done in more than 1 pass to prolong the life of the cutter.Rout in a clockwise direction, ensuring the guide bush stays in contact with the template constantly.
Check the machining is correct before moving on to the next stage.
Step 2 - Worktop Repair

Cutting the patch to thickness
Reduce the overall size of the worktop offcut to make it easier to cut down. Mark a line 14mm from the top and cut down with a hand held saw.
Hold off-cut in a vice or workmate if possible. Sand the back flat if necessary so that it is the same thickness all the way round.

Routing the damaged worktop
Fit the guide bush collar to the 20mm guide bush - this is very important! Clean the area where the template is to be fixed ensuring free from oil or dust, to prevent the template from slipping. Fix the template over the damaged area using strong double-sided tape, and check that it is held securely.
Starting in the middle of the template aperture, plunge down and rout, working your way to the edge of the template in a clockwise motion, until the guide bush collar has followed all around the template recess. Rout to a depth of 1mm deeper than the patch thickness, this should be done in more than one pass to prolong the life of the cutter.

Drilling access holes
Without undoing the template from position yet, drill two holes through the routed recess, making sure there is nothing impeding underneath.
The holes will allow you to push the patch out in the event that it is pushed below the surrounding surface.
Care should be taken to avoid applying too much side pressure when maneuvering the router, as this could unintentionally shift the template position, especially when using a heavy duty router, where it is easy to over-compensate.

Fixing patch in place
Offer the patch into the aperture to check fit. If all okay, pop it out again carefully. Remove the template from the surrounding area and clean off any residue, without getting the core of the chipboard worktop damp.
Apply a band of clear silicone (unless a better colour-match is available) around the top of the aperture, and a couple of blobs at the bottom, avoiding the access holes. Push the patch down in place until the surface is equal with the surrounding area. The joint line needs to be sealed so that water cannot penetrate through and expand the core of the worktop. Without pressing the patch in any further, fill silicone in the joint line where required.

Finishing up
Check surfaces are still level and adjust if necessary. A screwdriver can be inserted through the access holes to raise the patch if it has been pushed in too far in. Wipe any excess silicone away with suitable spirits.
Job Done! If machined and fitted accurately, this solution should give a much better appearance than leaving the damage, which could only get worse over time.
Given this, we think that people who have kitchen worktops installed should be encouraged to hang on to offcuts of their worktop in the event that a repair like this can be done.

The completed kitchen worktop repair.
Written by Derek Greig
Trend Technical Advisor