We use cookies to make your experience better. To comply with the new e-Privacy directive, we need to ask for your consent to set the cookies. Learn more.
Inlay Pattern Templates Routing Project
This project shows how to create inlay patterns in timber and wood-based material.
A plunge router, Inlay Kit and template are needed for this project. A shape is routed into a timber surface (known as a pocket), and another piece of material cut and inserted neatly in its place (known as an inlay or patch).
Step 1 - Preparing the Timber
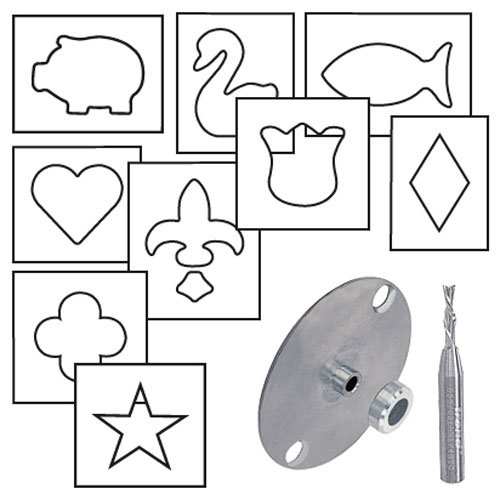
A range of inlay template designs are available, which can be viewed on the Trend website. Templates allow patterns to be copied and repeated into timber. Using the inlay kit, a patch can be made using the same template, producing a precise fit into the pocket.
Alternatively, the inlay kit can be used with a hand-made template, so that a unique design could be made. The minimum clearance needed in the template for the guide bush collar is 14.5mm.
The inlay kit Ref. INLAY/KIT/A includes a guide bush, an inlay collar and a 3.2mm down-cut spiral cutter, to create a clean finish on the material face.A sub-base may be required for certain makes and models of router where Trend guide bushes do not fit directly.

Contrasting colours of timber can be used to accentuate the pattern. The material for the inlay patches does not need be very thick, just a few millimetres.
It is advisable that some spare insert material is available.

For this project, I have chosen to use the heart shaped template Ref. TEMP/IN/HEA.
The height and centre positions for the inlays were calculated and lightly marked on the work-piece with a pencil.
Technical note: The finished size will be 6.3mm smaller all the way around the template if the Inlay kit is being used, due to the guide-bush/collar offset.

To hold the template in place, a couple of strips of sheet material were cut, one with a section cut to snugly house part of the template. The strips must be no thicker than the template and long enough to clamp to the edge of the work-piece (see inset photo). This method allows the template to be held remotely and avoid any clamps from obstructing the path of the router base.
Alternatively the template could be fixed down with double sided-tape, but care should be taken to ensure that the template is held sufficiently. The work-piece should also be fixed to the workbench.
Step 2 - Routing the Inlay Pockets
The guide bush was fitted to the router. The Inlay collar must be fitted to the guide bush for this stage to create the correct offset.

The cutter was fitted, ensuring the shank was sufficiently inserted in the collet to the K mark on the shank.
The plunge depth was set on the router for the pocket depth. Since the inlay cutter is a small diameter, light passes needed to be taken until the required depth was reached. The inlay patches could be made flush with the surrounding work-piece, or slightly stepped.

The router was switched on, plunged to depth and guided in a clockwise direction around the outline of the template, keeping the collar in contact with it.
The remainder of the pocket surface was routed off.

If several inlay pockets are to be machined, it may be worthwhile to increase the cutter size (and guide bush size), to remove the bulk of the surface material speedily. For example a 14mm diameter cutter and a 28mm guide bush Ref: C023A and GB28 could be used with the Heart pattern and other templates where the guide bush is not restricted.
Small radii left in the internal corners of pockets will need to be removed with a chisel or sharp knife.

It was now time to rout the inlay patches. If the inlay cutter and guide bush were removed, they need to be re-fitted to the router, but the collar must be taken off for this stage. A piece of timber should be placed underneath the inlay material being routed, to protect the workbench as the cutter passes through.
A tab of double-sided tape should be placed on the underside of the patch to be cut, so that it is held in place when parted off. The template and work-piece were clamped in place and the inlay patch routed out, with the router travelling in a clockwise direction. Again, light passes should be taken until the full depth of material has been cut.
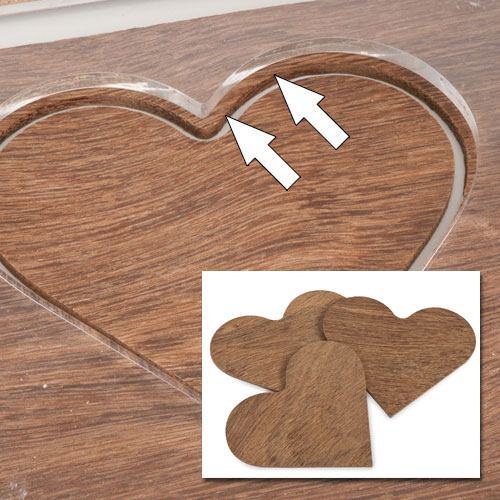
For this stage, it is important that the guide bush follows the template constantly, without deviating from the intended path, as this would notch in to the shape being made.
For instance, at the top point of the heart, as the router is coming out of the left curve, the tendency may be to let the router continue through in an arc motion, but instead needs to stay firm on the edge of the template as it enters in to the right curve. (See photo).
By using the technique of rolling the guide bush at this point rather than pushing it sideways will help to keep it in contact with the template.
Repeat as necessary.

Any feather-edges should be removed and the patches checked for fit in the pockets.
The patches were then glued in place. Since thin timber can curl when glue is applied to one side, the patches may need to be held in place with a clamp arrangement until the glue has set.
If the patches are being fitted flush, any discrepancy in material surfaces after the glue has dried should be planed or scraped rather than sanded. This prevents apposing coloured dust from contaminating the contrasting timber during sanding.
A couple of coats of clear wood sealer/lacquer were applied to the work-piece.

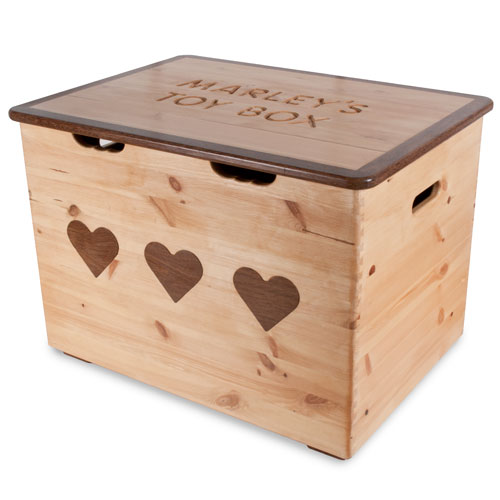
The finished Inlay Pattern Templates Routing Project, which show the inlays fitted to the side of a toy box.
Written by Derek Greig - Technical Advisor at Trend Machinery & Cutting Tools Ltd.